Best practice for uploading files to Moodle
Support resources are an important part of a subject’s learning and teaching content and often already exist in digital form. Uploading files directly to the subject site allows us to share content and ensure it is easy to locate and access (compared to, for example, sharing a file via email).
Uploaded files may be displayed in the site as individual resources or grouped together in folders and can be easily overwritten with updated versions in the future.
Considerations when uploading a file
There are two important considerations that should always be made when including a file in your subject site:
1. Is the file easy to locate and access?
It is important to provide adequate contextual information to all uploaded files. That is, files should have meaningful names, be clearly labelled and be presented contextually, i.e., in the same section, book, or folder as other related content.
2. Is the file optimised for use by all students?
To ensure that all students can access and engage with the materials uploaded to your subject site, there are some basic formatting strategies that can be employed.
The basic strategies for making digital content accessible are the same - regardless of the format it is presented in. Some simple strategies that can be applied to most text-based file types include:
- Headings - use the heading and subheading structure available in the authoring tool (e.g. Microsoft Word) rather than just changing the font size or weight to indicate a heading or subheading.
- Lists - use the numbered and ordered lists in the authoring tool.
- Hyperlinks - linked text should provide information about the destination of the link (e.g. 'Click to register' not 'Click here').
- Images - all images should have appropriate alternate text (alt text).
- Tables - tables in documents should only be used to represent tabular data, never to format content.
How?
Click on the headings below to expand/collapse the sections.
- Ensure Edit mode is on.
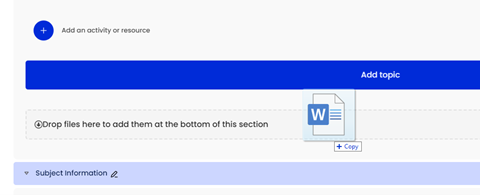
- Drag and drop a file to the bottom of the section you want to add it to.
Note: As you drag the file onto the Moodle site page, you will see a drop zone appear that says Drop files here to add them to the bottom of this section.
- Ensure Edit mode is on.
- Click the Add content (+) button at the bottom of the section, or around existing activities and resources by hovering over the dotted line that separates them.

- Select Activity or resource from the dropdown menu.

- Select the File resource from the Add an activity or resource chooser.

- Enter a meaningful file title into the Name text box.
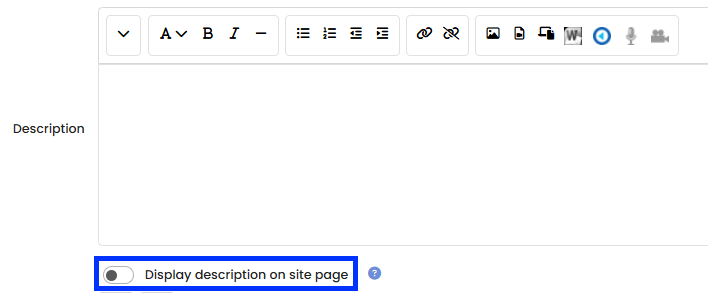
- [Optional] Provide context for the file in the Description text box and click the Display description on site page toggle to have it display below the file. Refer to the Adding contextual information article for additional guidance.

- Add your file in the Select files section by dragging and dropping into the drop zone or clicking the Add... button and using the file picker to select it from your device.

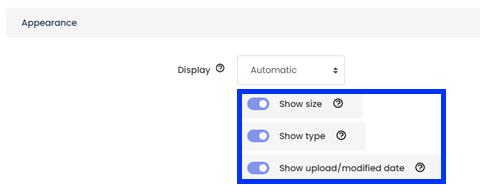
- Expand the Appearance section and click Show size, Show type, and Show upload/modified date toggles.

Note: This will add information about the file size, type, and date uploaded as shown in the example screenshot below.
- If Activity completion is enabled in your site, expand the Activity completion section and select the appropriate completion conditions.
- Click the Save and return to site button.
- Ensure Edit mode is on.
- Click the Add content (+) button at the bottom of the section, or around existing activities and resources by hovering over the dotted line that separates them.

- Select Activity or resource from the dropdown menu.

- Select the Folder resource from the Add an activity or resource chooser.

- Enter a meaningful folder title into the Name text box.
- [Optional] Type a description of the folder into the Description text box and click the Display description on site page toggle to have it display below the file. Refer to the Adding contextual information article for additional guidance.

- Add your files in the Content section by dragging and dropping them into the drop zone or clicking the Add... button and using the file picker to select them from your device.

- Select an option from the Display folder contents drop-down menu to choose whether the folder will open in a new tab when users click on it.

- Check the Show subfolders expanded checkbox if you would like the contents of subfolders expanded by default when the folder is opened.
- Allow users to download the entire contents of the folder in one go by checking the Show download folder button.
- Click the Save and return to site button.
Related Information
- Best practice for formatting content online | L&T Hub article
- Best practice for creating hyperlinks | L&T Hub article
- Make your content accessible to everyone (Microsoft suite) | External resource
- Improve accessibility with the Accessibility Checker (Microsoft suite) | External resource
- Create and verify PDF accessibility (Acrobat Pro) | External resource
- Make your Word documents accessible to people with disabilities | External resource


