Best practice for adding audio to your site
Providing students with multimedia resources that align with and reinforce text content is an effective way to cater to diverse learning preferences. While images and videos are commonly used, audio is also a valuable medium when used purposefully.
Depending on your context, audio can be used in various ways, such as:
- Interviews: Provide firsthand accounts or expert insights.
- Podcasts: Deliver in-depth discussions on topics.
- Role-play: Simulate real-life scenarios for skill development.
- Conversational Explanations: Clarify complex concepts or assessment tasks.
- Subject-Specific Sound Samples: For example, differentiating instruments in music education.
- Providing Student Feedback: Offer personalised feedback that can be more nuanced than written comments.
Why?
Audio, when used for storytelling or narrating complex topics, enhances both emotional and cognitive engagement. Storytelling makes content relatable and supports learners’ emotional connection to the material, fostering deeper learning (Mayer, 2021). Audio resources enhance the learning experience by conveying communication elements that text alone cannot capture, such as tone of voice, emphasis, humour, and correct pronunciation of terms. Compared to text-based content, audio can foster a stronger sense of social connection and presence (Ice et al., 2007).
Integrating audio aligns with Universal Design for Learning (UDL) principles by offering multiple means of representation, which supports the diverse needs of learners (CAST, 2024).
How?
You can add audio to your website using different ways, each with its use cases and benefits. With all audio recordings, consider:
- Chunking your audio into shorter, more digestible segments rather than a longer continuous record (Mayer, 2021).
- Using audio that is not directly relevant to the instructional goals—such as background music or unrelated sounds—can distract learners. Audio should be directly related to the content (Mayer, 2021).
- Unless ambient/background noise is directly supporting the content, aim to record in quiet settings with minimal background noise.
Uploading an audio file results in the resource appearing on the site page as a standalone resource ideally for student download. This method will also allow students to generate text transcripts of the audio file via Brickfield alternate formats.
You can upload an audio file so that it sits in context with text and other content. Most common audio formats are compatible with Moodle: .mp3, .aac, .flac, .m4a, .oga, .ogg, .wav.
To add audio:
- Navigate to where you would like to add an audio file in your subject site.
- If you are using the Atto editor, pictured below, click Insert or edit an audio/video file button.

If you are using the TinyMCE editor, pictured below, click multimedia.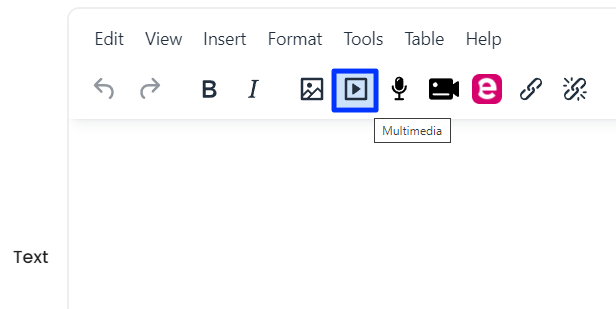
Note: the remaining are the same for both text editors (Atto and TinyMCE). - Click the Audio tab and then Browse Repositories.
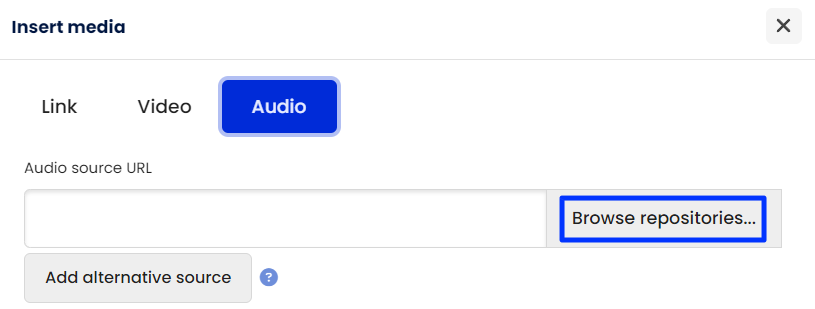
- In the File picker, click the left side tab Upload a file, then click Choose file.
- Locate the file on your computer and click Open.
- Type a name for the file in the Save as text field, then click Upload this file.
- Update other relevant information about the audio file by clicking Display, Advanced settings, and Subtitles and captions to expand those sections.
- Click Insert Media.
- Preview your audio file.
- Click Save and display. Once the page is saved, it will display the audio player.

For detailed guidance, refer to the How section of the L&T Hub article Recording your own audio and video.
Related information
-
Trill, buzz, floss, breathe: Coach yourself to sound your best Talent guide by National Public Radio (NPR) | External Resource
- Brickfields Education Labs - Media accessibility tips | External resource
References
CAST. (2024). Universal Design for Learning Guidelines Version 3. http://udlguidelines.cast.org
Ice, P., Curtis, R., Phillips, P., & Wells, J. (2007). Using asynchronous audio feedback to enhance teaching presence and students' sense of community. Journal of Asynchronous Learning Networks, 11(2), 3–25.
 Assistant
